Wednesday, May 29, 2013

UFO Racing League: The Tracks

I know I keep promising to talk about collisions.  When I started this walkthrough with a discussion of movement I suggested that collisions would be next but instead talked about the battery, because I forgot about it when talking about movement.  I want to talk about collisions.  But first, lets talk about one of the things you can collide with: walls.  Well, sometimes I'm going to call them bulkheads so that I can use one word to describe floors, ceiling, and walls that often don't have much to differentiate themselves.

The tracks in UFO Racing League are essentially large, empty space stations designed specifically as 3-dimensional race tracks.  Each track starts with a starting box where each space ship begins the race from a standing start and each track ends with an exit out of the track and into empty space.  The winner of the race is the first to exit the track.

The tracks in this game are built from modular pieces which are reused for other tracks or can be mixed and matched to create your own tracks.  Each track piece has one job: to convey where the bulkheads are.  Lets look a piece.

While its pretty easy to figure out where the walls are, the floors and ceilings are another matter.  On the piece below you can see that there are colors on the spaces as well as outside the walls.  These colors correspond to a color bar that measures elevation.  The color of the spaces represents the floor and the color along the walls represents the ceiling.  These colors match the color bars on the spine of each spaceship's stand and is repeated on each control board as well.  You will also see numbers along the sides of each track piece that show these values numerically as well.


On the above piece the floor is blue or 3.  That actually represents lowest elevation that a spaceship can be before it hits the floor.  The floor is technically just a bit below that.  The ceiling is red or 5.  Just like the floor this is the highest elevation a spaceship can be before it hits the ceiling.  Being at the height indicated for either the floor or ceiling is always ok, anything beyond that however will result in a collision.  (Yes, I promise collisions are next.)  So on this piece of track, a spaceship can be at elevation 3,4, or 5.

For many track pieces the ceiling and floor change in the middle of the piece.  Here is one of my favorite track pieces.

If you enter this track piece from the left side of this page, you are in a very high section of track -- the floor is at 6.  As you enter the corner of the turn, the ceiling remains at 7 (the highest in the game) but the floor drops down to 1 (the lowest).  After rounding the corner, the floor stays at 1 but the ceiling drops all the way to 2.

So spaceships travelling along this section of track must not only turn 90 degrees to the right, but they must also quickly drop from elevation 6 or 7 to elevation 1 or 2 and then stop dropping so that they don't hit the floor.

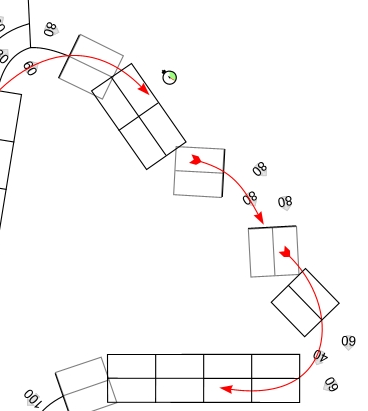
This next section is also one of my favorites.

This piece has a lot of elevation changes on it.  Again, if you enter the piece from the left side of the page, it starts out low (1-3) then very slowly increases in elevation as it turns in a spiral before actually running over itself at the end.

One of the fun things about this piece of track is that when a ship is on one of the four spaces that could be either the top or bottom of the spiral, I have yet to see anyone get confused about which part they are on because of the elevation difference.  If your ship is at elevation 3 or less you are in the bottom section.  If your ship is at elevation 5 or higher you are in the top section.

When racing this part of track, the tricky bit is that elevation changes do not overlap very much which creates a very narrow gap where the elevation changes.  So when moving from the 4-5 section to the 5-7 section (green floor to red floor) you have to be at elevation 5.  Any higher and you hit the ceiling in the lower part and any lower and you end up hitting a wall (we'll visualize that later).  That makes this piece a bit of a bottleneck.

Here, I've copied the graphic showing the elevation scale on the spine of the spaceship stands so that you can see all of the colors in order.

Someone asked me recently how I picked those colors.  I essentially started with "darker" colors for lower on the track and moved up to "lighter"colors for higher on the track.  That maybe a bit subjective and I think the numbers are key.  To some degree I expect that the colors are more important for warning that the ceiling or floor elevation has changed and you need to pay attention to that.  I don't really expect people to memorize the color scheme.  Then again, I've seen stranger behavior.

Saturday, May 11, 2013

Testing, Testing, Testing A New Track For Championship Formula Racing


When we last left the development of a Bahrain track I had a first draft of a track (shown to the right here) and was ready to try it out.  This is both the fun part and the part where ideas meet reality.

In order to test the track I build 10 cars based on whatever my current rule set it and run through a race with them on the track.  I try to create three kinds of cars based on three common strategy types: bid-high-race-from-the-front cars, bid-low-race-from-the-back cars, and some form of run-from-the-middle cars.  I do this right on the computer file -- moving car images around the track with blocks of car stats floating around outside the track.  If you have ever participated in my play-by-email races you have a general idea of what that looks like.

As I run through the track, I often make notes right on the track and if I see something I don't like or want to try I'll change it right away so that I can see if I like the change when the cars get back there next lap.  Here's a snap-shot from the end of one of my test races.


As I'm testing the track, I'm trying to do a couple things at the same time.  I'm making sure the corners work well.  I want the track to have a flow to it that reminds me of the race I just watched.  I want to make sure the straights are the right length -- do cars get up to the speeds I was targeting?  Also, my rough draft started testing at 84 spaces and I'm targeting 78 spaces so I'll be looking for places where I can shave off some spaces.

I had a lot of trouble with corner 3.  It started life at 120... with an arrow through the inside lane.  First off, I'm not sure I intended to make the outside and inside lanes 120.  But the bigger problem was that being able to go 140 through that corner on the line, made the corner very silly from a game perspective.  Even though the speeds were more similar to reality.

This brings up what I think is the core balance decisions with these tracks and really any game that strives for some level of simulation: the balance between realism and game play.  Sometimes those two things are at odds and a balance must be struct.  This was a situation where I quickly abandoned the real speeds so that I could get more of the right feel by reducing the speed through that corner.  I tried 100 all around the second lap and still felt it didn't have any affect and tried 80 with the line for the last lap of my first test race.

After the first race, I decided that there were two places I could try to take out spaces.  Besides the affect taking out spaces can have on how the track races I also try to make sure that the track still fits together when I am done.  So I took out a space right before corner 3 and right after corner 4.  By taking the spaces out of straights that are effectively on either side of a sharp corner, it shortend up both straights pretty equally.  I then did the same thing later in the track -- taking a space out before corner 7 and after corner 7.  This gets me down to 80 spaces -- which is close enough to 78 for my liking.


This worked out pretty well around corner 7.  The entry into corner 7 was not impacted and I still got a number of cars up to 180 on the straight after corner 7.

It didn't work as well around corners 3 and 4.  The combination of the slower speeds in corner 3 and one less space between corners 2 and 3 meant that if you ran corner 2 with some wear expense you very often ended up spending more wear in corner 3 as well.  That did not feel like how the real track worked.  Those corners are not really that close to each other.  Also I wanted to make sure that corner 2 was still a good place to make passes and making it even harder to spend wear there doesn't feel like what I wanted.  So I change corner 3 yet again.  I essentially moved the whole corner one space farther away form corner 2 and one space closer to corner 4.  This also meant that I had to do something about the lines for corners 3 and 4.  I ended up truncating the line for corner 3 so that it ended right on the inside 60 space of the corner.


I like the track I ended up with.  It seemed like it should generate some fun racing.  Its got some seriously long straights and a lot of them.


Next I will clean up the presentation of the track before the final step of building its physical form.

Tuesday, April 23, 2013

Turning Research Into a New Championship Formula Racing Track

After my initial research phase, I had some thoughts on how this track would end up looking but the track doesn't really start to come together until I watch the race run with real F1 cars.

Thanks to the modern miracle of the DVR, I watched this past weekend's Bahrain race over the last couple of nights.  During the pre-race I may pick up a few thoughts from the commentators about parts of the track and sometimes I get to see another qualifying lap but the best part of the race for me are the first couple of laps -- especially lap 1.

I'm looking for a couple of things during the race itself.  Where are the best opportunities for passing on the track?  What lines do cars take through the corners -- especially when more then one car is going through the corner at the same time.  The ideal racing lines are easy to figure out.  What it looks like when 2 or 3 cars try to go through a corner wheel-to-wheel is impossible to figure out until you see cars try to do it in real life.

From the game perspective this all translates into corner layout and track width.  Corner layout, to me, is the core of track design.  The speeds and positions of the corners define a track in a very real way.  Most tracks also have a couple of corners that are either signatures for the track or just more interesting or important then the others.  For Bahrain I focused on corners 1 and 13.

Sunday night I got through pre-race and about the first 15 laps of the race.  By now I had worked through several different rough ideas about corners and track widths in different places.  Not too far into last night's watch of the remainder of the race I had settled on track widths and where the corners would be and started sketching out ideas for the layout of the important corners on scratch paper while I watched the race.

After the race was over I rewound back to the start and watched the first half of lap 1 again.  Then I sat down and roughed out the more straight forward corners and how long I thought the straights should be -- mostly based on top speeds achieved at the end of those straights and distances between corners.

Note, I'm going to start off referring to corners by their real world numbering by default.

Corner 1 was great fun during the race with lots of wheel-to-wheel action and I quickly decided that this would have to be the most interesting corner on the track.  While most corners really have one good way through them, this corner almost demanded a good secondary line.  During pre-race I decided that a couple corners I thought I could ignore might need more attention including corner 2.  But I didn't want the track to end up with too many corners so I ended up squishing corners 1 and 2 into a single speed circuit corner.  I often end up doing this.  There is a huge difference between having 2 corners a space or 2 apart and having 1 corner that is a couple spaces longer.  Although sometimes, having two separate corners makes more sense.  Corner 1 went through the most iterations during this part of the process but I like where I ended up here.

I'm still ignoring corner 3.  Corner 4 becomes the 2nd corner on the speed circuit track and looks pretty straight forward.  Corners 5 and 7 get ignored.  Corner 6 becomes corner 3 for speed circuit.  Corner 8 becomes corner 4.

I decide that corners 9 and 10 will become a single speed circuit corner... but a more interesting corner then the usual layout.  On track, the corner speeds drop considerably from 127 to 39 MPH between the two corners.  So I end up with a corner where the speed of each space in the corner is slower then the speed of the space in front of it... in the inside lane the speed actually goes from 100 to 60 in one space.  In the outside the corner speeds start at 100 then go to 80 and then 60 in three spaces.  No line for this corner.

Corner 11 becomes a straightforward corner (#6) on the speed circuit track.

Corner 12 was another corner I was planning to ignore.  But during pre-race it was lumped in with corner 13 a lot as essentially a very long two-apex corner.  So I ended up doing something similar to the layout I used to squish corners 9 and 10 together, but made it longer and more gradual.  Its also a corner that gets slower as it goes, so that seems like it will work.

Finally, corner 14 becomes the speed circuit tracks final corner #8 and I ignored corner 15.

Note that I'm now going to refer to corners by their speed circuit numbering.  (See below.)

I went back and forth on track width.  Visually I found it hard to tell if there were parts of the track that were noticeably wider then others.  But when I do a track, I end up paying as much attention to how a track races then how wide it really is.  Most of the wheel-to-wheel action was on the front straight through corner 1 and onto the next straight.  In the end, I made everything from the front straight through to corner 2 3-wide (minus the back half of corner 1).  Then its 2-wide through what is essentially the in-field and then back to 3-wide for the run down to the last corner and onto the front straight.

I find that I always start off sketching out straights that are too long.  My first pencil and paper sketch of the speed circuit track was 94 spaces long when I was targeting 78.  But I'll deal with that in my next step.

My next step is to take my many pieces of paper sketches and create a rough outline of a track on the computer.  This doesn't take me too long because I'm mostly laying out straights and very roughly indicating corner speeds, spaces, and lines.  This is where I often end up having to change straight lengths again in order to make the track fit roughly the shape it should be.  So now I'm look at the relative physical lengths of straights to help me cut down the overly long straights I sketched out based on top speeds and some innate desire to have a 24 space long 3-wide straight on every track.

As it all comes together for the first time, everything gets tweaked a little more -- even corners.


Now I'm ready to race the track for the first time.

Friday, April 19, 2013

Preparing to Build a New Track for Championship Formula Racing

For years now, I've been on a mission to create a track for Championship Formula Racing (my flavor of the classic 3M Speed Circuit) for every modern F1 track I could.  Hard for me to believe, but I've got 19 1/2 in the bag over the last 6 years (I've got two version of Silver Stone after a revision to the track in 2010).  One of the three tracks in the 2013 F1 calendar that I do NOT have done yet is coming up this weekend -- Bahrain.  This time, I'm going to do my work in public and let everyone ride along on my process.

Its the Friday before F1 races at Bahrain and that's the day I normally do my prep work.  Before I watch the race on Sunday, I want to have a track map with corner speeds, straight-line speeds, and a rough idea of how many corners I think I will end up with and how many spaces long the track will be.

First thing I need is a good track map.  The official F1 site has some good ones.  I'll crop that out and print it as a primary place to make notes on before and during the race.


The main thing I want to do before a race is find as much speed related data as possible for different parts of the track.  The two best sources of this information are the official F1 site and the Brembo brakes F1 site.

The official F1 site.  They will give you speeds in many corners and also speeds through a number of speed traps -- usually at the end of the longer straights.  This gives me a lot of good speed numbers from lots of the track.  For Bahrain I get 16 different speeds.  That's more raw information then I get from Brembo but I then supplement with the great data from Brembo.

Brembo provides brakes for many of the F1 teams and after Friday practice, they put all the braking data they get from every partner team together and report out on the braking areas of the track.  Specifically I'm looking at the initial speed (speed before they start braking) and the final speed (slowest speed in the corner).  This data is much better then the official F1 site data because its completely current (the official F1 site data rarely changes from year to year whereas the Brembo data does.  The other nice thing is that Brembo is specifically tracking braking events which is different then just displaying speeds at different points.  Where as the official F1 map claims that Bahrain has 15 corners, Brembo reports that it only has 8 braking events.


Now I convert all those speed from KPH to MPH and write them down on my track map.  Between my two sources I've got pretty good coverage on my map.

Next I calculate how many spaces long I think the track should end up.  The way I do that is to divide the length of the track in kilometers by .069.  Bahrain is 5.412 kilometers long so I will be trying to get the game version to about 78 spaces.  This will just be a guide for me, however, not a hard requirement.

Where does .069 come from?  I'm not exactly sure how it started.  Before I did my first track in this style, I did an analysis of the old Avalon Hill tracks looking at trends: average number of corners = 9; average corners speed = 99, average longest straight = 17 spaces, average 3-wide track = 15%; average track length = 72 spaces (for the statistically inclined, the medians were very close to the averages except that the median 3-wide percentage was 0%).  However, there did not seem to be any consistent conversion ratios that I could discern.  So I started out building Catalunya with a target to build tracks that were a little shorter then the old Avalon Hill tracks: closer to 60 spaces and 8 corners then 72 and 9.  Catalunya came in at 60 spaces and 8 corners but -- in hind sight is probably a good bit shorter then it should be.  But after that I had a rough conversion of track length to spaces that I could use as a guide for later tracks.  Early on I used it a very rough guide but now that I'm 20 tracks into this, .069 is the average of the ratios for all 20 tracks I've done so far.
Random fact: based on the current ratio a space in my tracks is 4/100th of a mile or 76 yards long.

Finally, I stare at the track a bit and look at the Brembo data especially and guess at how many and where the corners are for game purposes.  For Bahrain, it looks pretty straight forward. I don't see any reason why Brembo's 8 braking areas can't turn into 8 corners for the track.

Something else I can do prior to the race is watch a video of a lap on the official F1 site in their video section.  Besides, being very fun to watch, this can confirm some things I'm seeing in the data,  For instance, corners 2 and 3 don't get tracked as braking events by Brembo and sure enough Vettel is accelerating through both of those as he exits corner 1.  Corner 6 is very fast but tracked as a braking event by Brembo and yes, Vettel hits the brakes there and doesn't just coast some using the gearing to slow down.  Corners 8 and 9 are essentially one corner -- Vettel brakes before 9 and coasts into 10, not back on the gas till he leaves 10.  Now I thought 12-13 might be like that as well, but Vettel flies through 12 before hitting the brakes in front of 13, so I was wrong there and note on my sheet that 13 is the corner, not 12-13.  And finally its clear that 14 is the final real corner here with 15 being where Vettel begins the acceleration onto the front straight.

Next, I watch the race... well assuming my DVR records the race despite being apparently on its last legs.

Wednesday, April 3, 2013

Ghost Stories, Is It Bad To Be Hard?


I have a love-hate relationship with Ghost Stories.  On the one hand, its a good game.  On the other hand, IT IS SO HARD.  I bought the game years ago in cardboard and it took me many, many plays to win my first game on the easiest level.  But it doesn't get a lot of plays.

In February, I bought the iPad implementation.  I figured it would be a good game for the iPad.  Its got the draw back / feature of most pure cooperatives: its essentially a solitaire game.  I thought maybe playing it more often would allow me to win some games.  Not so much.

Above: me getting crushed.  Below: a snapshot of my leader board.  Notice, mostly me getting crushed.


A week or so after I got the game, I won 2 games in 20 attempts, on the easiest level of the game.  I basically gave up after that.  I decided that the game was just too hard.

Then, I read an interview with Ghost Stories' creator, Antoine Bauza, on Little Metal Dog Show.  The interviewer actually asks Mr. Bauza early on why he made Ghost Stories so hard and the answer is basically, yea we didn't want it to be so easy like some other cooperatives.  Then he reached out through the computer and smacked me in the face:

But to tell you the truth, the game is not so hard and when you know it well you cannot lose at all in easy mode and almost never lose in normal or nightmare mode.
...

What?  Are you kidding me?  I'm losing 90% of my easy games!  Am I doing this wrong?

So, I went to the internet -- specifically BGG's strategy forum for the game.  Wow.  I was seriously doing this wrong.

Since then, I've won 8 games in 14 tries and I seem to be getting better: 6-2 in my last 8 games.  I may even be ready to move up to whatever level is above beginner.

I think this may say more about me then the game.  I tend to like games that I can jump into quickly with some competence and enjoy.  My last instinct is to research strategies online.  I'm usually the opposite of a min-maxer.  I like my games with flavor more then ideal efficiency engines.

The other thing about Ghost Stories is that it really introduces the concept of "hard" to board games.  Normally, the difficulty of a board game is defined by your opponents, not the game itself.  And here Mr. Bauza is correct, most cooperative/solitaire games are not this hard.

And you know what?  Now that I'm competent (at easy), I'm addicted.  So maybe this hard thing is good.

Friday, March 22, 2013

Championship Formula Racing Rankings


Speed Circuit is one of the earliest games I got into when I was still at home.  I played it frequently with my parents but picked it back up again many years later at then Avalon Con.  For the last 15 years or so, I've been running the tournament there (now WBC).  In fact, the flavor of that game that became associated with me is now officially getting its own name (Championship Formula Racing) and published version in 2015!

I've been doing driver rankings on the sly for a number of years now so that I could seed qualifying races at WBC.  But, a couple things happened that have led to a more public ranking.  I wasn't really trying to keep it a secret and people eventually started peeking at the list and making fun of their friends -- so the data was out there and people were interested.  A couple of other large series started using very WBC-like rule sets with no restriction on who could participate -- so I now figured I should take those results into account and so a new ranking is born.

Lets skip to the end.

Here's the current rankings (PDF).

That number on the left -- the score -- is the main factor.  Everything else is a data dump and tie-breakers. What makes up that score?  In short: race results from WBC-like series; from the last 3 years; scaled and normalized based on the series they occurred in; per event participated in.

Lets unpack that.
Race results from Championship Formula Racing-like series. Right now I've identified three series that I include in these rankings: WBC itself, the WBC PBeM, and my own PBeM which I've been using as a test bed for Championship Formula Racing rules changes.  In theory series and tournaments using different flavors of the rules could be included, but I don't think I'd include tournaments that used drastically different rules then Championship Formula Racing or that are not broadly participated in.  One person's version is nothing like another's when all of our rule modifications are longer than the original rules.

From the last 3 years.  What I really mean here is the last 3 instances of each of the approved series/tournaments.  The WBC PBeM has only occurred once (although iteration two is just beginning) and my personal PBeM just started using WBC-like rules last iteration, so the current scores include any results from the last 3 WBC events plus the only WBC PBeM, and the most recent of my PBeM.

Scaled and normalized based on the series they occurred in.  This is where the math is.  Of the three series I'm looking at, two are very similar in structure and the third is very different so I deal with the two types differently.

My PBeM is run as a series of 3 races with points given out for race finishes.  After the three races, the driver with the most points wins.  This is actually pretty easy to deal with.  In order to normalize points, I re-scale points given out in the series so that first place is worth 100 points.  There is one complication in that the series is broken down into tiers, so that the best drivers from the last season race against each other, then the next tier, etc.  In the series, lower tiers are given less points for race results, so that scales easily enough, but I also end up discounting race wins in lower series for the purpose of this ranking.  For instance, Grant Guillard won a couple races last season but he did it in the second tier and so his entry in the PDF shows his best finish as a 2nd.  The end result is that most race finish positions are worth some number of points in this series.

The other two series -- the WBC based ones -- are run as elimination tournaments where a series of 2 or 3 qualifying races are run and the best finishes from those races get to participate in a winner takes all final race.  The ultimate goal is to win that final race, in the qualifying races it is most important to finish well enough to get to the finals.  Otherwise, a 4th is just as good as crashing if neither gets you to the finals.  However, a first is marginally better then a second because there are some advantages garnered for the finals.  For these series, qualifying race results are discounted by at least half.  So a race win in qualifying would not be worth more then 50 points.  In qualifying, only the top four finishes gain you any points at all.  This is because, no one has ever qualifying for the finals based on anything worse then a 3rd place finish.  Fourth place is getting some points, because there are rare times at WBC when a 4th will get into the finals as an alternate.  While there are multiple qualifying races in these series, only a driver's best performance gains them full points.  Second or third best results are discounted even further because their impact is even less.  For the finals race, I used WBC's laurels as a way to scale final result points.  So points go all the way down to sixth in the finals.

Since each series has a different number of races and/or scoring systems, the total points in play are different for all three.  So after adding points up for each series, I normalize against an event maximum of 100 points.  So, if someone were to win every race they could possibly enter in an event, they would get 100 points.

Here's a real world example:
2012's WBC Champion Bruce Rae ran in two of the three qualifying races -- one win, one dnf -- then won the finals.  Bruce got 50 points for his qualifying win.  Then he got 100 for the finals win.  A perfect score at WBC would be 187.5 (100+50+25+12.5 since each successive qualifying result is halved).  (150 / 187.5 ) * 100 = 80.

Per event participated in.  And this is why Bruce is ranked 6th and not 2nd.  A driver's final score is the average of their points from the events we scored for them.  So, while Bruce got an 80 in that championship run, he scored 16 points in 2011 at WBC, 0 in 2010 at WBC, 0 in the WBC PBeM, and 31.88 in my PBeM.  So we add that all together and divide by 5 to get Bruce's final score of 25.58.

There is one tweak to this averaging.  If a driver only has one event being scored, I halve their score.  Only two and I deduct 25%.  One example of this is Turyko Suky.  He participated in the WBC PBeM but that was his only scored event for this ranking.  He did reasonably well in that event: winning one qualifying race, finishing 7th in another, and finishing 5th in the finals of the WBC PBeM.  For that he got 40 points.  Unmodified, that would have put him 4th -- in front of the last three WBC champions, who also happened to participate in at least 2 other scored events.

Obviously, there is more detail to the maths, but I didn't want to spend too much time on this.  Feel free to ask detailed questions and I will be happy to answer.  I plan to update these rankings every time one of the scored series is completed and also immediately before each WBC.  If you are aware of a series or event that you believe is WBC-like in its rules set and open to all participants, let me know so I can try to include it in future rankings.

Wednesday, March 20, 2013

UFO Racing League, The Battery

Last post I promised we'd talk about collisions.  But lets talk about the battery first.

Each UFO comes with a battery where energy can be stored.  If you have energy in your battery -- we have two chips on the battery circled below...


...you can take that energy and add it to the base new thrust you got this turn.  You can take some or all of it.  But you can not put it back.  If you take it, you must use it.

So how do you end up with energy in your battery?  When you are placing new thrust, instead of adding it to the 3D compass rose, you can add it to your battery.  For every 2 thrust put on the battery space in the new thrust area you can put 1 energy in your battery.

Below we are putting two chips on the battery space, along with a couple thrust on the compass rose.


When you move the new thrust up to the current momentum compass rose in order to figure out your movement for this turn, you can move energy to your battery.  In this case, the two chips becomes one chip and is added to your battery space.


You can not put only 1 thrust in the battery space in the new thrust area... all energy put into the battery is rounded down and the remainder discarded.

Next, we really will talk about collisions.  Or... Tracks.  I know completely not the same thing.  Maybe I'll tease you forever promising to talk about collisions.

Monday, March 4, 2013

UFO Racing League, Basic Movement Walkthrough

Before I get too far into talking about the status of UFO Racing League, I figured I should walk through the game as it is.  Not too many details here, just the basics.

In the future, we race space ships instead of race cars -- of course.  The UFO Racing League is akin to NASCAR in space in style.  The space ships in the series were nicknamed UFOs because that's what they look like.

Each player gets a control board that they use to track the status of their ship's momentum, height, damage, battery, and set new thrust.  Below is the control board for the Blue #3 UFO.  For now, we will just worry about the parts related to movement -- the core of the game.


The top left of the board is where the ship's current momentum is tracked (close-up below).  Note that momentum is tracked along 3 axis: one vertical; and two horizontal axis.  Small blue poker chips are stacked in the circles to indicate how much momentum the ship currently has in that direction.  In the middle is a picture of your UFO.


The momentum chart shows us how to move your UFO when its your turn to do so.  Below we see some blue chips in different places on the compass.  One chip on the up side of the vertical axis, one chip on one side of one of the horizontal axis, and two chips stacked on one side of the other horizontal axis.  This shows us that on our turn, we must move our ship up one, one space this way , and two spaces this way .


Note, UFOs do not have a front or a back.  So horizontal movement is made in the absolute direction of that axis.  In order to facilitate this, everyone's board should be placed on the table perpendicular to the track -- not at an angle.

So lets see how this movement works on a track.  Below we are looking at an overhead of the UFO on a piece of track.


When we move our UFO, we must move one axis at a time, but we must move the entire thrust in an axis when we move it.  We can not split up the move.  So, lets move this way  first.  We have to move two spaces that way so we end up here (translucent marker show where the ship was before).


Note that we could not have moved only one space, moved a different direction and then moved another space in this direction.  We had to move both spaces at once.  Next lets move this way  the one space we need to.


Finally we must move up one space.  Each UFO sits on a plastic base with a series of 7 steps that indicate the UFO's current height.  Below, we move from height 4 to height 5:


Now that we've seen the very basics of movement, lets learn how to change our speeds or momentum in these different directions.

The bottom of the board is where you set set your ship's new thrust at the beginning of a turn (close-up below).  Note that the basic, 3-dimensional compass rose is essentially copied with the addition of a space where energy can be ear-marked for your battery (more on batteries later).


At the beginning of every turn, you will receive some number of small blue poker chips, which represents the energy output of your ship that turn.  This energy is placed anywhere on the thrust chart or onto the battery area next to the thrust chart.

Below, we have placed four energy in different places around the thrust chart: one up, one this way , and two this way .


This is how we change our momentum from turn to turn -- by adding this thrust to our current momentum to find our new momentum, and thus how we will move our UFO this turn.

After everyone has had a chance to set their thrust for this turn (done secretly behind a screen), we must consolidate new thrust and old momentum.  Step one is to move all thrust from the thrust chart up to the same compass rose locations on the momentum chart.  In the example below, I changed the color of the new thrust tokens to red to highlight what was new and what was old.


We don't normally want momentum in two opposite directions, so its time to simplify.  Lets look at this  axis first -- highlighted by the green arrows.  Last turn we had one momentum this way .  This turn we added two thrust this way .  In all situations like this we subtract the smaller amount from the larger amount.

That will leave us with one momentum going this way .  We see the result of that below, and our next axis highlighted in green.


Now we subtract 1 new momentum  this way from the two momentum we had this way .  That leaves us with one this way .  And we move on the vertical axis.


In this situation, we added 1 thrust up to the one thrust we already had going up to end up with two thrust going up.  Now we know have our resolved momentum for this turn and can move our UFO again.


Next Time: Collisions! Or maybe Batteries! (I know, it doesn't have the same ring.)