I've posted the first of 4 videos of my solo race at Mexico City. Keep an eye on the YouTube channel for updates. I'll blog it again when all the videos are posted -- probably next week some time.
Below is part one, where I try again to push my start speed and yes, I do mis-shift for the 3rd race in a row.

Tuesday, June 27, 2017
Tuesday, June 20, 2017
The Basic Historical Strategies for CFR
This is the first in a planned 4-part series looking at the Historical Strategies I built for Championship Formula Racing and what I was thinking. [ Historical Driver rules, video demo ]
Broadly, I tend to group strategies for CFR along a continuum defined by when in a race wear is spent. On one end is the Front strategy where wear is mostly spent early in a race. On the other end is the Back strategy where wear is spent late in a race.
A classic Front strategy would see a driver bid high for pole, start off fast, and spend more wear early. When you see extreme examples of this, you will often see the driver run through half or more of their total wear through the first third of a race and end up with only a wear or 2 before the last third of the race. A classic Back strategy would see the driver spend no wear at all for the first third of the race. Spending most of their wear over the last half of the race.
So lets kick off the series by looking at each phase of three strategies that illustrate this continuum: Front A, Back Standard, and Even.
First a quick acknowledgement that these are not exactly the strategies that were published under these names. Three minor editorial choices I've made since publication: 1) HDs can push start using only 1 green skill (the start speed test table changed a bit right before publication...); 2) I decided that the red skill chip could be used more places in relation to HD die rolls; 3) there were a few tactics that had 6 symbols on them and my BYO tool only allows for 5... Links to these version in my BYO tool are at the end of this article.


The main way to measure a phase's intent is to look at the first starred and non-stared symbols in each tactic. This gives you a sense of how much faster the car will likely try to go. Think about it this way -- a car that wants to spend 1 wear in the upcoming corner will try to go 20 mph faster than a car that does not want to spend any wear, all other factors being equal.
If you then multiply each of those possible results by the odds of them being first choice, I get a net result of how much faster this car wants to go. It might not be able to go that fast, but that's on the driver not the strategy. I'm going to call this "net" in tables below.
Note that anything with 3 circles of any kind, should be considered starred because that is how the tracks are designed. Also note, that if a tactic does not lead with a starred option, I'll count the first un-starred option for that tactics starred value since its more likely to be used.
Not Starred:
Front A: net +29 mph (52.9% +20, 47.2% +40)
Even: net +5 mph (72.3% +0, 27.8% +20)
Back S: net +0 (100% +0)
Starred:
Front A: net +42 mph (52.9% +40, 27.8% +60, 19.4% +20)
Even: net +28 mph (58.4% +20, 41.7% +40)
Back S: net +5 mph (72.3% +0, 27.8% +20)
In the first phase we can also look to see how likely the car is to push it's start speed:
Front A: 92%
Even: 33%
Back S: 28%


Front A stays faster here. Note that Even is much faster in this phase if it has more wear than c. Otherwise, Back S is actually faster under starred conditions.
Not Starred:
Front A net +38
Even (if w >= c) net +20
Even net +6
Back S net 0
Starred:
Front A net +44
Even (if w >= c) +31
Back S net +20
Even net +14


Even is now the faster strategy in this middle part of the race:
Not Starred:
Even net +34
Front A net +15
Back S net +11
Starred:
Even net +34
Front A net +23
Back S net +26


Lots of conditions here. But in the end each strategy ends up being as fast as their remaining wear let them. Without stars, if wear <= c their nets are between 17 and 20. When wear >= c their nets rise to 20 to 32. When wear >= 2c their nets are all +40.
But since Front A and Even have been faster earlier in the race, Back S is likely to be faster here with more wear to burn.
Over the course of a race, HDs will spend most of their time in phases 2-4. So let's quick see each strategy's progression over time:
(Not Starred) phase 2 >> phase 3 >> phase 4
Front A net +38 >> +15 >> +17
Even net +6 >> +34 >> +20
Back S net +0 >> +11 >> +20
Some caveats... Front A cars often do not spend much time in phase 4 because Front A HDs often run out of wear early and skip out of phase 4 into phase 5 after a corner or 2.
Even HDs will likely be faster in phase 2 than net +6 because they will frequently have more wear than c and use net +20 options.
Back S' real speed will vary on how much it can save wear in the early race. Save enough and it will skip into phase 4 early and spend at its higher rates of +32 or +40 for a while.
Hopefully that all made some sense and sounded like real CFR strategies at work. Next up I'll discuss the variations on the Front A strategy. Until then, feel free to tinker in the BYO tools with your own strategies.
Broadly, I tend to group strategies for CFR along a continuum defined by when in a race wear is spent. On one end is the Front strategy where wear is mostly spent early in a race. On the other end is the Back strategy where wear is spent late in a race.
A classic Front strategy would see a driver bid high for pole, start off fast, and spend more wear early. When you see extreme examples of this, you will often see the driver run through half or more of their total wear through the first third of a race and end up with only a wear or 2 before the last third of the race. A classic Back strategy would see the driver spend no wear at all for the first third of the race. Spending most of their wear over the last half of the race.
So lets kick off the series by looking at each phase of three strategies that illustrate this continuum: Front A, Back Standard, and Even.
First a quick acknowledgement that these are not exactly the strategies that were published under these names. Three minor editorial choices I've made since publication: 1) HDs can push start using only 1 green skill (the start speed test table changed a bit right before publication...); 2) I decided that the red skill chip could be used more places in relation to HD die rolls; 3) there were a few tactics that had 6 symbols on them and my BYO tool only allows for 5... Links to these version in my BYO tool are at the end of this article.
Phase 1


If you then multiply each of those possible results by the odds of them being first choice, I get a net result of how much faster this car wants to go. It might not be able to go that fast, but that's on the driver not the strategy. I'm going to call this "net" in tables below.
Note that anything with 3 circles of any kind, should be considered starred because that is how the tracks are designed. Also note, that if a tactic does not lead with a starred option, I'll count the first un-starred option for that tactics starred value since its more likely to be used.
Front A: net +29 mph (52.9% +20, 47.2% +40)
Even: net +5 mph (72.3% +0, 27.8% +20)
Back S: net +0 (100% +0)
Starred:
Front A: net +42 mph (52.9% +40, 27.8% +60, 19.4% +20)
Even: net +28 mph (58.4% +20, 41.7% +40)
Back S: net +5 mph (72.3% +0, 27.8% +20)
In the first phase we can also look to see how likely the car is to push it's start speed:
Front A: 92%
Even: 33%
Back S: 28%
Phase 2:


Not Starred:
Front A net +38
Even (if w >= c) net +20
Even net +6
Back S net 0
Starred:
Front A net +44
Even (if w >= c) +31
Back S net +20
Even net +14
Phase 3:


Not Starred:
Even net +34
Front A net +15
Back S net +11
Starred:
Even net +34
Front A net +23
Back S net +26
Phase 4:


But since Front A and Even have been faster earlier in the race, Back S is likely to be faster here with more wear to burn.
Strategy Trends
Over the course of a race, HDs will spend most of their time in phases 2-4. So let's quick see each strategy's progression over time:(Not Starred) phase 2 >> phase 3 >> phase 4
Front A net +38 >> +15 >> +17
Even net +6 >> +34 >> +20
Back S net +0 >> +11 >> +20
Some caveats... Front A cars often do not spend much time in phase 4 because Front A HDs often run out of wear early and skip out of phase 4 into phase 5 after a corner or 2.
Even HDs will likely be faster in phase 2 than net +6 because they will frequently have more wear than c and use net +20 options.
Back S' real speed will vary on how much it can save wear in the early race. Save enough and it will skip into phase 4 early and spend at its higher rates of +32 or +40 for a while.
Hopefully that all made some sense and sounded like real CFR strategies at work. Next up I'll discuss the variations on the Front A strategy. Until then, feel free to tinker in the BYO tools with your own strategies.
Tuesday, June 13, 2017
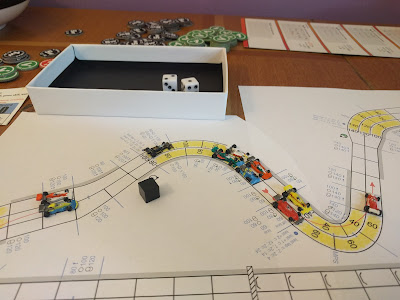
Oyama -- Solo Championship Formula Racing 2017
On to race 4 of my 10 race solo season this year. Race 3 was Monza which started in this blog post. Jackie Stewart really consolidated his lead after Monza in the series championship, can anyone make up ground on him this race?
Oyama is a very short track with few corners and high speeds. And I will only be doing 2 laps here. This should go quick. In fact, I was planning to show this entire race on video but my phone stopped recording after 30 minutes. I was not sure why, so I reverted to the photo-blog approach. Turns out this is just how the phone is.
So set-up and first 2 turns are in the video below. Turns 3 through the end of the race follow in picture format. Since this was a short race, I actually took a picture after every turn post video fail.
Turn 3:
In In turn 2 I got stuck in the corner and Hunt got stuck as well. Hunt (in the white car) wastes another space in this faux corner with me in the way... again.

Turn 4:
Fangio leads the field into the 2nd third of the race. Yes this track is that short. Vettel is only a couple spaces back. Jackie Stewart (orange car) is stuck in the corner behind Vettel as the field squeezes together through this tight infield section.

Turn 5:
Alonso in the yellow car stuffed me again. I thought about late braking to take the line for less wear but have wear to burn and did not want to risk the brakes damage. So I end up behind Alonso hoping for a slip and that gives Hunt room to take the line underneath me.
Up front Vettel spends 2 wear to catch up to Fangio.

Turn 6:
Fangio and Vettel enter the massive final corner of lap 1 side by side. My play last turn does not help as Alonso does not give me a slip and hunt beats me to the 120 lane and I end up stuck in another corner.

Turn 7:
You can see below how things really spread out again. It feels like lap 1 has been a bad one for me so far. But Jackie Stewart, despite being 3rd right now, has only 1 wear left after bidding 5 at the start. Raikkonen has still not spent a wear. Does he have time to make up ground?

Turn 8:
Vettel pushed his top speed last turn to pip Fangio through the corner and then did it again this turn to extend his lead. But now he's out of green skill. I end up wide in the last corner with a slight log-jam in the inside lane.

Turn 9:
Top speed starts to matter. Vettel rolls dice to extend his lead. Stewart gets to 180 to close on Fangio. Alonso passes Rindt (in the green car) by pushing to 180 as well. I pull even with Hunt as I gun it while exiting the corner.

Turn 10:
Jackie Stewart now has his orange car right on Fangio's bumper. Rindt is now a couple space behind Alonso and I pull even with him after passing Hunt.

Turn 11:
I swing wide to give me a the line heading into the first corner of lap 2. Hunt gets 2 slips from me and dives inside.

Turn 12:
Most of the field is now in the last third of their races. Alonso flies out of the first corner into the second corner, past Jackie Stewart, and into 3rd. I pull even with Stewart.

Turn 13:
Alonso dives inside Fangio. Rindt catches up to Hunt behind Stewart and I.
Turn 14:
The field tightens again. I late braked to make sure I beat Jackie to the corner and pass him for 4th. Alonso is not able to stay in front of Fangio with Fangio on the line. Both are only a couple spaces in front of me but Vettel looks to have the race in hand.

Turn 15:
Fangio and Alonso spend 2 wear each to gain some ground on Vettel. I'm saving my wear for the last corner.

Turn 16:
Fangio and Alonso underspent in the last corner and will finish with wear on their tires. I spend my last 2 wear to pull ahead of Jackie Stewart and the field. I'm hoping for my top speed to win the day in the last couple of turns.

Turn 17:
I come out of the corner right behind Fangio and Alonso and decide to tuck in behind Alonso who could go 180 next turn.

Turn 18:
That worked out. Alonso goes 180 and passes Fangio. I get the double slip from Alonso to pass both of them and now I'm only a space behind Vettel! The entire rest of the field is now stuffed into 3 rows just out of the last corner. Raikkonen, who has spent his entire race in the back, sits 9th behind Hunt on the outside rail, hoping for some slips.

Turn 19:
I push to 200 and beat Vettel across the line.
Raikkonen gets the double slip from Hunt to go from 9th to 5th and push Stewart down to 6th.

Turn 20:
Only 2 rolls were failed all race. My start speed push at the start and now Mansell in the black car failing a roll at the end here. Interestingly, neither really mattered as I ended up with the win and Mansell would have ended up 10th either way.
Fittipaldi gets a slip from Raikkonen to end up 6th. That puts Jackie Stewart 7th.

Jackie Stewart finally seems human although retains his lead in the standings. Vettel and I gain a lot of ground on him though.
Oyama is a very short track with few corners and high speeds. And I will only be doing 2 laps here. This should go quick. In fact, I was planning to show this entire race on video but my phone stopped recording after 30 minutes. I was not sure why, so I reverted to the photo-blog approach. Turns out this is just how the phone is.
So set-up and first 2 turns are in the video below. Turns 3 through the end of the race follow in picture format. Since this was a short race, I actually took a picture after every turn post video fail.
Turn 3:
In In turn 2 I got stuck in the corner and Hunt got stuck as well. Hunt (in the white car) wastes another space in this faux corner with me in the way... again.

Turn 4:
Fangio leads the field into the 2nd third of the race. Yes this track is that short. Vettel is only a couple spaces back. Jackie Stewart (orange car) is stuck in the corner behind Vettel as the field squeezes together through this tight infield section.

Turn 5:
Alonso in the yellow car stuffed me again. I thought about late braking to take the line for less wear but have wear to burn and did not want to risk the brakes damage. So I end up behind Alonso hoping for a slip and that gives Hunt room to take the line underneath me.
Up front Vettel spends 2 wear to catch up to Fangio.

Turn 6:
Fangio and Vettel enter the massive final corner of lap 1 side by side. My play last turn does not help as Alonso does not give me a slip and hunt beats me to the 120 lane and I end up stuck in another corner.

Turn 7:
You can see below how things really spread out again. It feels like lap 1 has been a bad one for me so far. But Jackie Stewart, despite being 3rd right now, has only 1 wear left after bidding 5 at the start. Raikkonen has still not spent a wear. Does he have time to make up ground?

Turn 8:
Vettel pushed his top speed last turn to pip Fangio through the corner and then did it again this turn to extend his lead. But now he's out of green skill. I end up wide in the last corner with a slight log-jam in the inside lane.

Turn 9:
Top speed starts to matter. Vettel rolls dice to extend his lead. Stewart gets to 180 to close on Fangio. Alonso passes Rindt (in the green car) by pushing to 180 as well. I pull even with Hunt as I gun it while exiting the corner.

Turn 10:
Jackie Stewart now has his orange car right on Fangio's bumper. Rindt is now a couple space behind Alonso and I pull even with him after passing Hunt.

Turn 11:
I swing wide to give me a the line heading into the first corner of lap 2. Hunt gets 2 slips from me and dives inside.

Turn 12:
Most of the field is now in the last third of their races. Alonso flies out of the first corner into the second corner, past Jackie Stewart, and into 3rd. I pull even with Stewart.

Turn 13:
Alonso dives inside Fangio. Rindt catches up to Hunt behind Stewart and I.

Turn 14:
The field tightens again. I late braked to make sure I beat Jackie to the corner and pass him for 4th. Alonso is not able to stay in front of Fangio with Fangio on the line. Both are only a couple spaces in front of me but Vettel looks to have the race in hand.

Turn 15:
Fangio and Alonso spend 2 wear each to gain some ground on Vettel. I'm saving my wear for the last corner.

Turn 16:
Fangio and Alonso underspent in the last corner and will finish with wear on their tires. I spend my last 2 wear to pull ahead of Jackie Stewart and the field. I'm hoping for my top speed to win the day in the last couple of turns.

Turn 17:
I come out of the corner right behind Fangio and Alonso and decide to tuck in behind Alonso who could go 180 next turn.

Turn 18:
That worked out. Alonso goes 180 and passes Fangio. I get the double slip from Alonso to pass both of them and now I'm only a space behind Vettel! The entire rest of the field is now stuffed into 3 rows just out of the last corner. Raikkonen, who has spent his entire race in the back, sits 9th behind Hunt on the outside rail, hoping for some slips.

Turn 19:
I push to 200 and beat Vettel across the line.
Raikkonen gets the double slip from Hunt to go from 9th to 5th and push Stewart down to 6th.

Turn 20:
Only 2 rolls were failed all race. My start speed push at the start and now Mansell in the black car failing a roll at the end here. Interestingly, neither really mattered as I ended up with the win and Mansell would have ended up 10th either way.
Fittipaldi gets a slip from Raikkonen to end up 6th. That puts Jackie Stewart 7th.

Jackie Stewart finally seems human although retains his lead in the standings. Vettel and I gain a lot of ground on him though.
Friday, June 9, 2017
A Peek Behind the CFR Organized Play Curtain: Race and Series Data
Michael P asked:
So the winner of a race with an AFR of 1 gets 23 points for that effort. While the winner of a race with an AFR of 2 would get 46 points. I simply multiply the AFR for a race and the points a driver earned in that race to get their adjusted points for that race. These adjusted points are what you see in the rankings.
I do the exact same thing for any tournaments or online seasons or series. If Michael wins a tournament with an AFR of 1.5 he gets 34.5 points for that. If I win a PBeM season with an AFR of 0.5 I get 11.5 points.
As you can see, AFR is very important for rankings.
Race and Series names. No there is no real convention to these names.
Drivers. This is the number of drivers who participated in a race or event. Mostly just for informational purposes.
The number of drivers does not have a direct bearing on AFR or rankings but races and events with more drivers tend to have higher AFRs because AFR is effectively a counting stat. In other words, I mostly add stuff together to get an AFR. I don't average things. My logic being that a race with 12 drivers is harder than one with 6. Same goes for events.
Field Rating. This is the sum of each drivers' best four races over the last 2 CFR OP seasons. In order to not end up in a formula loop, a drivers' best four races is scored by the un-adjusted points scored in those races. I use the last 2 seasons in order to provide more data about each driver and get a better sense of their skill level.
This field rating is the raw data used to calculate AFR.
Adj Field Rating. Here's AFR. What I do to get from a raw field rating to AFR is to find the median Field Rating for all races (or all series) over the last 2 CFR OP seasons divide the raw Field Rating by that median. So, AFR is effectively a measure of that race or series Field Rating as compared to the median over the last 2 seasons. An AFR over 1 indicates that it was more difficult than usual while an AFR below 1 indicates the opposite.
Odd Rules. This is a toggle I use rarely when a race or series has some seriously odd rules to it. Not so odd that I do not use it at all, but odd enough that I want to devalue it for rankings. The only current event marked odd is the Redscape Race of Champions.
If a race or series is marked as odd, all points gained from that race or series are halved. This is done after the AFR is calculated.
Year. This really means season. I have this field for both data sets but hide it for races. I am only showing races from the 2017 season in the above PDF. I show it for series because I show series from past seasons there just for fun.
Note that no one can get championship points from past events even though those events (and races) can have AFRs.
Pts Adjustment. This is where I calculate the adjustments to points due from either odd rules or the race/series being from a past season. A points adjustment of 1 is normal and means no adjustment is made. A points adjustment of 0 means that there will be no points from this thing.
Track. For races, I try to keep track of which track was used. I don't really do anything with this yet and it does not impact standings.
Laps. For races, I try to keep track of how many laps are run. I don't really do anything with this yet and it does not impact standings.
Steward. I like to keep track of who volunteers their time and hard work to run events. But again, I don't do anything with this yet and it does not impact standings.
Is it possible to also publish a list of the ranked races along with field strength for each?Sure thing Mike!
Why is this data important?
Every race and series is graded based on what I call an adjusted field rating (AFR). This number indicates how good the competition in the event is and adjusts scores accordingly.So the winner of a race with an AFR of 1 gets 23 points for that effort. While the winner of a race with an AFR of 2 would get 46 points. I simply multiply the AFR for a race and the points a driver earned in that race to get their adjusted points for that race. These adjusted points are what you see in the rankings.
I do the exact same thing for any tournaments or online seasons or series. If Michael wins a tournament with an AFR of 1.5 he gets 34.5 points for that. If I win a PBeM season with an AFR of 0.5 I get 11.5 points.
As you can see, AFR is very important for rankings.
What do all these fields mean?
Below I explain what each field is calculating and how it impacts the rankings.Race and Series names. No there is no real convention to these names.
Drivers. This is the number of drivers who participated in a race or event. Mostly just for informational purposes.
The number of drivers does not have a direct bearing on AFR or rankings but races and events with more drivers tend to have higher AFRs because AFR is effectively a counting stat. In other words, I mostly add stuff together to get an AFR. I don't average things. My logic being that a race with 12 drivers is harder than one with 6. Same goes for events.
Field Rating. This is the sum of each drivers' best four races over the last 2 CFR OP seasons. In order to not end up in a formula loop, a drivers' best four races is scored by the un-adjusted points scored in those races. I use the last 2 seasons in order to provide more data about each driver and get a better sense of their skill level.
This field rating is the raw data used to calculate AFR.
Adj Field Rating. Here's AFR. What I do to get from a raw field rating to AFR is to find the median Field Rating for all races (or all series) over the last 2 CFR OP seasons divide the raw Field Rating by that median. So, AFR is effectively a measure of that race or series Field Rating as compared to the median over the last 2 seasons. An AFR over 1 indicates that it was more difficult than usual while an AFR below 1 indicates the opposite.
Odd Rules. This is a toggle I use rarely when a race or series has some seriously odd rules to it. Not so odd that I do not use it at all, but odd enough that I want to devalue it for rankings. The only current event marked odd is the Redscape Race of Champions.
If a race or series is marked as odd, all points gained from that race or series are halved. This is done after the AFR is calculated.
Year. This really means season. I have this field for both data sets but hide it for races. I am only showing races from the 2017 season in the above PDF. I show it for series because I show series from past seasons there just for fun.
Note that no one can get championship points from past events even though those events (and races) can have AFRs.
Pts Adjustment. This is where I calculate the adjustments to points due from either odd rules or the race/series being from a past season. A points adjustment of 1 is normal and means no adjustment is made. A points adjustment of 0 means that there will be no points from this thing.
Track. For races, I try to keep track of which track was used. I don't really do anything with this yet and it does not impact standings.
Laps. For races, I try to keep track of how many laps are run. I don't really do anything with this yet and it does not impact standings.
Steward. I like to keep track of who volunteers their time and hard work to run events. But again, I don't do anything with this yet and it does not impact standings.
Wednesday, June 7, 2017
With Redscape Season 3 in the Books an Organized Play Update

On the right is turn 28. I'm in the blue car leading the field. I've got 4 wear left and the win is not really in doubt.
Fabio is in the Brown car currently in 3rd. Fabio came into this race with more points on the season and can win the season if he finishes 2nd. He has a single wear left.
The green car inside Fabio is Tim. Tim is not in contention for the Redscape Season 3 championship. Tim is also out of wear so unlikely to hold Fabio off.
I had a decision to make for turn 29. Do I secure the victory by going 140 to the line for the last corner (just out of view above). Or slow to 100, letting Tim probably line up beside me, and blocking off Fabio if I catch him off guard. The risk is that if Fabio decides to spend his wear now, I'll be passed and lose the race as well as the series championship.

As you can see, the gamble paid off. Both Tim and Fabio planned for 120 this turn. Tim went first from the inside lane and took the spot, forcing Fabio to late brake.
Next turn I crossed the finish line. Tim takes the line at 80 which forces Fabio into the 80s for his last wear... still behind Tim. Giovanni got a slip from me and ended up passing Fabio. It was then pretty much impossible for Fabio to regain 2nd.
It is possible that Fabio may have thrown things at me. At least rhetorically.
But the end result was that I got my second race win in what has, so far, been the most competitive series in this season of Organized Play as well as the Redscape season 3 championship. That netted me a ton of points and catapults me to the current OP season lead.

Giovanni ended up 2nd in Redscape's last C1 race and 2nd on the season and that pushed him up to 2nd in this Organized Play season. Fabio's 3rd place finish on the Redscape season pushed him from 6th to 4th in organized play. Doug G and Don were not in the top series this Redscape season and so dropped some as other drivers picked up points around them.
- Complete June update (PDF) of CFR OP rankings
- Previous update this season
There will be some other races before WBC, but probably nothing with the potential to net someone a lot of points.
Last year, a WBC qualifying race win was worth around 18 points and the finals win was worth 33 points for the race and another 18 points for winning the tournament.
Looking at where the top cars sit in the standings currently, it looks to me like Doug G is the driver with the potential to knock me out of the top spot. With a win in qualifying and a win in the finals, Doug could pick up 63 points and jump back up to the OP season lead. But if attendance is up or down from last year, that can change everything.
Thursday, June 1, 2017
Infinity Miniatures Painting: Geckos, Mobile Brigada, and Alguacil
Time for a check to see how the Infinity painting is going. I've actually made a ton of progress because I took a week off between an old job and a new job and a good bit of painting got done. But Michael still had school to go to so basing is falling behind.
However, here was our first batch of Nomads. I asked for less green for this group of figures but Michael got creative with razor wire. He said that the Gecko here walked through some and is busy unwrapping his legs.
Again, painting by me and basing by Michael. Here are my notes from our first batch. The first group of photos are using my foam 'rocks' as a background, the second group are using my basic trees as a background.
GECKO SQUADRON (w/ razor wire)


GECKO SQUADRON (covered with ash... probably from something he blew up)


MOBILE BRIGADA


AGUACIL (two of them... failed to get a good pic of the third in two tries...)


Subscribe to:
Posts (Atom)