Wednesday, May 29, 2013

UFO Racing League: The Tracks

I know I keep promising to talk about collisions.  When I started this walkthrough with a discussion of movement I suggested that collisions would be next but instead talked about the battery, because I forgot about it when talking about movement.  I want to talk about collisions.  But first, lets talk about one of the things you can collide with: walls.  Well, sometimes I'm going to call them bulkheads so that I can use one word to describe floors, ceiling, and walls that often don't have much to differentiate themselves.

The tracks in UFO Racing League are essentially large, empty space stations designed specifically as 3-dimensional race tracks.  Each track starts with a starting box where each space ship begins the race from a standing start and each track ends with an exit out of the track and into empty space.  The winner of the race is the first to exit the track.

The tracks in this game are built from modular pieces which are reused for other tracks or can be mixed and matched to create your own tracks.  Each track piece has one job: to convey where the bulkheads are.  Lets look a piece.

While its pretty easy to figure out where the walls are, the floors and ceilings are another matter.  On the piece below you can see that there are colors on the spaces as well as outside the walls.  These colors correspond to a color bar that measures elevation.  The color of the spaces represents the floor and the color along the walls represents the ceiling.  These colors match the color bars on the spine of each spaceship's stand and is repeated on each control board as well.  You will also see numbers along the sides of each track piece that show these values numerically as well.


On the above piece the floor is blue or 3.  That actually represents lowest elevation that a spaceship can be before it hits the floor.  The floor is technically just a bit below that.  The ceiling is red or 5.  Just like the floor this is the highest elevation a spaceship can be before it hits the ceiling.  Being at the height indicated for either the floor or ceiling is always ok, anything beyond that however will result in a collision.  (Yes, I promise collisions are next.)  So on this piece of track, a spaceship can be at elevation 3,4, or 5.

For many track pieces the ceiling and floor change in the middle of the piece.  Here is one of my favorite track pieces.

If you enter this track piece from the left side of this page, you are in a very high section of track -- the floor is at 6.  As you enter the corner of the turn, the ceiling remains at 7 (the highest in the game) but the floor drops down to 1 (the lowest).  After rounding the corner, the floor stays at 1 but the ceiling drops all the way to 2.

So spaceships travelling along this section of track must not only turn 90 degrees to the right, but they must also quickly drop from elevation 6 or 7 to elevation 1 or 2 and then stop dropping so that they don't hit the floor.

This next section is also one of my favorites.

This piece has a lot of elevation changes on it.  Again, if you enter the piece from the left side of the page, it starts out low (1-3) then very slowly increases in elevation as it turns in a spiral before actually running over itself at the end.

One of the fun things about this piece of track is that when a ship is on one of the four spaces that could be either the top or bottom of the spiral, I have yet to see anyone get confused about which part they are on because of the elevation difference.  If your ship is at elevation 3 or less you are in the bottom section.  If your ship is at elevation 5 or higher you are in the top section.

When racing this part of track, the tricky bit is that elevation changes do not overlap very much which creates a very narrow gap where the elevation changes.  So when moving from the 4-5 section to the 5-7 section (green floor to red floor) you have to be at elevation 5.  Any higher and you hit the ceiling in the lower part and any lower and you end up hitting a wall (we'll visualize that later).  That makes this piece a bit of a bottleneck.

Here, I've copied the graphic showing the elevation scale on the spine of the spaceship stands so that you can see all of the colors in order.

Someone asked me recently how I picked those colors.  I essentially started with "darker" colors for lower on the track and moved up to "lighter"colors for higher on the track.  That maybe a bit subjective and I think the numbers are key.  To some degree I expect that the colors are more important for warning that the ceiling or floor elevation has changed and you need to pay attention to that.  I don't really expect people to memorize the color scheme.  Then again, I've seen stranger behavior.

Saturday, May 11, 2013

Testing, Testing, Testing A New Track For Championship Formula Racing


When we last left the development of a Bahrain track I had a first draft of a track (shown to the right here) and was ready to try it out.  This is both the fun part and the part where ideas meet reality.

In order to test the track I build 10 cars based on whatever my current rule set it and run through a race with them on the track.  I try to create three kinds of cars based on three common strategy types: bid-high-race-from-the-front cars, bid-low-race-from-the-back cars, and some form of run-from-the-middle cars.  I do this right on the computer file -- moving car images around the track with blocks of car stats floating around outside the track.  If you have ever participated in my play-by-email races you have a general idea of what that looks like.

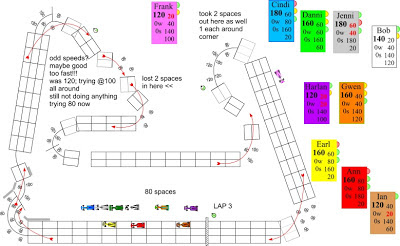
As I run through the track, I often make notes right on the track and if I see something I don't like or want to try I'll change it right away so that I can see if I like the change when the cars get back there next lap.  Here's a snap-shot from the end of one of my test races.


As I'm testing the track, I'm trying to do a couple things at the same time.  I'm making sure the corners work well.  I want the track to have a flow to it that reminds me of the race I just watched.  I want to make sure the straights are the right length -- do cars get up to the speeds I was targeting?  Also, my rough draft started testing at 84 spaces and I'm targeting 78 spaces so I'll be looking for places where I can shave off some spaces.

I had a lot of trouble with corner 3.  It started life at 120... with an arrow through the inside lane.  First off, I'm not sure I intended to make the outside and inside lanes 120.  But the bigger problem was that being able to go 140 through that corner on the line, made the corner very silly from a game perspective.  Even though the speeds were more similar to reality.

This brings up what I think is the core balance decisions with these tracks and really any game that strives for some level of simulation: the balance between realism and game play.  Sometimes those two things are at odds and a balance must be struct.  This was a situation where I quickly abandoned the real speeds so that I could get more of the right feel by reducing the speed through that corner.  I tried 100 all around the second lap and still felt it didn't have any affect and tried 80 with the line for the last lap of my first test race.

After the first race, I decided that there were two places I could try to take out spaces.  Besides the affect taking out spaces can have on how the track races I also try to make sure that the track still fits together when I am done.  So I took out a space right before corner 3 and right after corner 4.  By taking the spaces out of straights that are effectively on either side of a sharp corner, it shortend up both straights pretty equally.  I then did the same thing later in the track -- taking a space out before corner 7 and after corner 7.  This gets me down to 80 spaces -- which is close enough to 78 for my liking.


This worked out pretty well around corner 7.  The entry into corner 7 was not impacted and I still got a number of cars up to 180 on the straight after corner 7.

It didn't work as well around corners 3 and 4.  The combination of the slower speeds in corner 3 and one less space between corners 2 and 3 meant that if you ran corner 2 with some wear expense you very often ended up spending more wear in corner 3 as well.  That did not feel like how the real track worked.  Those corners are not really that close to each other.  Also I wanted to make sure that corner 2 was still a good place to make passes and making it even harder to spend wear there doesn't feel like what I wanted.  So I change corner 3 yet again.  I essentially moved the whole corner one space farther away form corner 2 and one space closer to corner 4.  This also meant that I had to do something about the lines for corners 3 and 4.  I ended up truncating the line for corner 3 so that it ended right on the inside 60 space of the corner.


I like the track I ended up with.  It seemed like it should generate some fun racing.  Its got some seriously long straights and a lot of them.


Next I will clean up the presentation of the track before the final step of building its physical form.