I spent a good bit of time trying to come up with viable Historical Driver (HD) strategies and a variety of Drivers themselves. But now I am really excited to see what everyone else can come up with.
So I built a tool to let you build your own strategies and drivers.
BYO Tools

Thursday, May 25, 2017
Tuesday, May 23, 2017
Monza (part 3) -- Solo Championship Formula Racing 2017
The last lap in this 4-lap chase around Monza -- leg 3 of my solo season -- and I'm back in 7th but only a turn or a little more behind 2nd place.

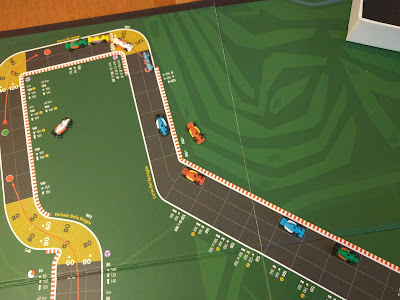
Above you can see that 2nd place right now is a fight between Alonso (in red), Raikkonen (in blue), and Vettel (also in red but behind Raikkonen). Raikkonen only has 4 wear but the much bigger top speed. Alonso has 7 wear. Vettel has 11 wear.
Jackie Stewart is still not threatened but will have to nurse his damaged 140 top speed for this lap. He has 4 wear left.
The very next turn, Alonso gives up second after damaging his top speed.

A couple turns later, in the above picture, Raikkonen remains in second through corner 1. Meanwhile, I gained some ground on Fangio and Hunt who are right in front of me because neither spent enough wear to clear corner 1. I end up passing Hunt the very next turn.
There is little action after that as the cars weave through the next 3 corners. Then Raikkonen uses his top speed advantage down the back straight to close in on Stewart up front. Alonso fails his second top speed test of the lap and has to retire from 3rd. Fangio damages his engine on a top speed roll as well.
Fangio ends up failing another top speed test the very next turn to pull over next to Alonso as the 3rd retirement of the race -- all engine failures.

As you can see above, Raikkonen's pressure on Stewart ends up being short lived as he could not clear Ascari without any wear and ends up having Vettel close up on him. I'm in 4th mostly because of Alonso and Fangio's retirements.
Fittipaldi passed both Hunt and Rindt in the back a turn before the picture above, but Rindt used wear and a slip to pass back through Ascari.
Stewart is clearly on his way to a 2nd consecutive race win.

Vettel exits the final corner of the race inside Raikkonen and pushes his top speed across the line. But Raikkonon also pushes and just calims 2nd. I was a little too far back and end up in 4th still.
Rindt, Fittipaldi, and Hunt end up in 5th, 6th, and 7th -- the same order you see them above having just cleared the final corner.
 Season Update
Jackie Stewart really consolidated his series lead in this race. He has nearly twice as many points as 2nd place Vettel. Vettel jumped up to 2nd with his 3rd consecutive 3rd place finish.
Fangio's DNF dropped him only 1 point below me. While Raikkonen's 2nd place jumped him up 2 spots to 5th.
Next Race
The next race will be a 2-lap affair at Oyama -- perhaps the fastest and shortest track I've made. Will this be another good track for Raikkonen or will the race be too short for his race-from-behind strategy?

Above you can see that 2nd place right now is a fight between Alonso (in red), Raikkonen (in blue), and Vettel (also in red but behind Raikkonen). Raikkonen only has 4 wear but the much bigger top speed. Alonso has 7 wear. Vettel has 11 wear.
Jackie Stewart is still not threatened but will have to nurse his damaged 140 top speed for this lap. He has 4 wear left.
The very next turn, Alonso gives up second after damaging his top speed.

A couple turns later, in the above picture, Raikkonen remains in second through corner 1. Meanwhile, I gained some ground on Fangio and Hunt who are right in front of me because neither spent enough wear to clear corner 1. I end up passing Hunt the very next turn.

There is little action after that as the cars weave through the next 3 corners. Then Raikkonen uses his top speed advantage down the back straight to close in on Stewart up front. Alonso fails his second top speed test of the lap and has to retire from 3rd. Fangio damages his engine on a top speed roll as well.
Fangio ends up failing another top speed test the very next turn to pull over next to Alonso as the 3rd retirement of the race -- all engine failures.

As you can see above, Raikkonen's pressure on Stewart ends up being short lived as he could not clear Ascari without any wear and ends up having Vettel close up on him. I'm in 4th mostly because of Alonso and Fangio's retirements.
Stewart is clearly on his way to a 2nd consecutive race win.

Vettel exits the final corner of the race inside Raikkonen and pushes his top speed across the line. But Raikkonon also pushes and just calims 2nd. I was a little too far back and end up in 4th still.
Rindt, Fittipaldi, and Hunt end up in 5th, 6th, and 7th -- the same order you see them above having just cleared the final corner.

Jackie Stewart really consolidated his series lead in this race. He has nearly twice as many points as 2nd place Vettel. Vettel jumped up to 2nd with his 3rd consecutive 3rd place finish.
Fangio's DNF dropped him only 1 point below me. While Raikkonen's 2nd place jumped him up 2 spots to 5th.
Next Race
The next race will be a 2-lap affair at Oyama -- perhaps the fastest and shortest track I've made. Will this be another good track for Raikkonen or will the race be too short for his race-from-behind strategy?
Tuesday, May 16, 2017
Monza (part 2) -- Solo Championship Formula Racing 2017
Lap 2, continued:
At the end of part 1 of this 3 part play report, I had slipped through the pack into a decent position. The next turn put me 3-wide with Fangio and Alonso. I was not on the inside, so I went faster than I should have and late braked using a wear to beat them to the line outside corner 2.
That allowed me to beat the pack through that line and into the thin section of track through the Lesmo corners as you can see below. I'm in the old blue car. Jackie Stewart is still leading way off in the distance. Vettel still has a stranglehold on 2nd.

On a design tangent -- this is sometimes a blind spot for the Historical Drivers. The instructions on the side of the track do not usually provide the opportunity to late brake in order to take a line before the corner with the "!". Those exclamation points are almost always reserved for situations where the HD would enter the upcoming corner.
Nothing too exciting would happen until the pack approached the Variante Ascari when Alonso got a slip and ducked inside Raikkonen and I right before the corner then spent 2 wear powering through to take 3rd.
The next turn he pushed his top to 180 and I ended up with the double slip to even with him inside the Parabolica, pictured below. I'm the old blue car next to Alonso's red car. Stewart and Vettel are still a turn and 2 turns ahead of us, starting lap 3. This photo is actually not accurate. After I took the shot I decided that Raikkonen would take 2 slips into the corner for 2 wear to end up right behind me.

Lap 3:
The very next turn, Mansell pushes his top speed through the Parabolica and fails... damaging his top speed down to 120. This is the first damage of the race, but I don't think it will be the last as we are only half way through.
A couple turns later most of us are through the 1st corner of lap 3. Last turn, Alonso (the red car in 3rd in the above picture) created a gap to Raikkonen and I by beating us to the first corner and late braking -- trapping both of us in the corner and allowing the pack to catch up.

In the image below, a couple more turns have lapsed. Alonso caught up to Vettel before the 2nd corner and then spent more wear to pull inside. Raikkonen (in the blue car in 4th) got the jump on everyone heading into that same corner but damaged his brakes late braking. I took a slip into the corner.

The image below is one turn later. Jackie Stewart damages his top speed coming down the straight. Will that hurt his chance for the win? Alonso beat Vettel through Lesmo to take over 2nd. Raikkonen gains more ground on the leaders. Lots of cars pass me through corner 2.

The turn after this, Stewart hits the 2nd stop-watch of Lap 3 and the final third of the race is underway. But not before Nigel Mansell fails his second top speed test, blows the engine, and is our first retirement.
Thursday, May 11, 2017
Build Your Own Infinity Terrain: Woods and a Short Haul Space Truck

Then I show you my sniper tree... which I love.
The last thing I show off is part of the short haul space truck I built. You can see the final product on the side here.
Go ahead and watch the video. Then I'll go through some better explanation for how that particular piece comes together.
Huge thanks to Braddock Station Garrison for the rocking music. Their newest album is awesome, check it out.
Most of the supplies are nothing fancy. I just use regular craft glue, cardboard is cardboard, I'm not sure you can go wrong with the kind of foam core you get. I did use white however.
The card Stock I usually use is 65 lb but I have used thinner stuff. Sometimes the thinner stuff is called cover paper instead of card stock -- it's fine and cheaper.
The full sheet label paper is Avery 8465. I'm sure other companies make something similar. It is sold as a shipping label thing. I've even used it for that every once in a while.
PDFs:
- Basic Tree (1 trunk, 3 bases, 3 tops)
- Root Boxes (x2)
- Bushes (x2, front and back)
- Sniper Tree (1 tree front and back)
- Short Haul Space Truck (1 cab, 1 trailer)
The Short Haul Space Truck
The truck has two pieces -- essentially two boxes with stickers on them.
The cab is the part where the driver / pilot sits. I have it split into a couple rooms. If you have monitors or computer terrain bits, you could put them in here to add some character. The trailer is the part that the shipping containers sit on.
Before you start, print out the PDF above on full sheet label paper. Then cut out each individual piece with a craft knife and straight edge or a paper cutter.
First we build the boxes, then we stick the labels on.
I linked to this in my discussion of the army boxes I built, but this is crucial info so go watch this video again from the Esoteric Order of Gamers.
The Cab
The cab is a large box with a removable lid. First I cut out a piece of foam core the same size as my floor sticker. Immediately, I break my rule about putting stickers on after boxes are built... it is probably easier to put the cab floor sticker on now before you make the box.
Now I cut out 4 walls -- again the same size as my stickers. Note that a couple of my stickers are too short. You can kind of see that in the picture below where the green sticker on the right side does not go all the way to the edge of the box. So double check your measurements against the floor piece you already have to make sure your box is constructed correctly. If the sticker does not reach all the way to the edge of the box that's ok. If the walls of the box are the wrong size that is not so ok.
Below you can see the bottom of the completed box. I applied glue to the edges of the floor piece and than stuck the bottoms of two opposite walls to those edges and secured with straight pins. Then applied more glue to the edges of those wall sides before adding the other two walls. Then more straight pins.

Now you can apply stickers to the sides of the cab. Note that the front window sticker is on the same sheet as the sticker for the top of the cab.
Below, you can see that I cut out two more short walls and glued those to the floor and interior wall along the grey cross that is printed on the floor sticker. That creates an air-lock type hall way from the side door and a small office room to break up the interior. Clearly you could ignore my interior plan and add walls how you want.

You can also see that I cut out the side door. I did this carefully(ish) so that I could jam it back in there when I want the door closed.

Now you need the roof. For this piece of foam core I measured the complete width and length of the current piece. It should be the same size as that roof sticker but you want the roof to rest on the tops of the walls. I cut that piece out and then attached the roof sticker to it.
I also cut out small rectangles of foam core to match the solar panels, stuck the extra stickers on them and then glued that over the black rectangles on the roof sticker. This gives the roof a bit of extra detail.

On the bottom of the roof, I took some extra squares of foam core and glued them near the corners. This helps keep the roof from sliding off during play. I'm not looking for a snug fit, just a bit of a catch if it gets knocked.

Now we can sit the roof on the rest of the cab.

The Trailer
The trailer is built in a similar fashion but is a shorter closed box.
The most important thing to note when building this box is that the top will be longer than the bottom by the width of the ramps. Below you can see the ramp edge of the trailer. The ramps and the landing in between are part of the top of the trailer box.

So, cut your sides and bottom appropriately and after you glue the top onto the bottom and sides, the ramp portion of the top will be hanging over one edge of your box.
Before you do anything else, apply stickers to the sides and top.
To make the ramps, cut along the red lines that should match up to the edge of the box bottom. The two lines go pretty far in, but leave a landing to connect the ramps to the top of the trailer box.
Next, cut two triangular grooves at the edge of the landing from below. These wedges will allow the ramps to hinge at those points. Careful not to cut all the way through. You are trying to leave the top layer of the foam core intact.

Now bend the ramps up above the top of the box and apply some glue to the edges facing the rest of the box. Then swing the ramps down down so that the ends of each ramp meet the bottom edge of the box and press to the sides until the glue sets.

All done and ready to add to your table.
Note that you could make this longer by simply building more trailers to stick behind the cab.


Tuesday, May 9, 2017
Monza (part 1) -- Solo Championship Formula Racing 2017
Race 3 sees my Solo Championship Formula Racing series head from Monte Carlo to Monza for a 4 lap race. I've replaced most of my components with ones from the actual production game box. Note that I'm working with 2 boxes worth of material here. Mostly this means I have 2 of each strategy card.


Above we see the payoff for Vettel (in red) as he has a gap now between him and the rest of the pack. And we can barely see Stewart (green) off in the distance having completed his first third of the race.
This was an interesting turn through the first corner for the pack. Fangio, Mansell (1st white car), and Hunt (2nd white car) started this turn 3-wide in front of the corner: Fangio on the line and Hunt outside. I (old speed circuit car) was on the line behind Fangio and feared I was going to be blocked but plotted 100 to leave options open and to delay the brakes test if I had to. Lucky for me the seas parted and I got through for 2 wear, passed two cars and pulled up next to Fangio.
Raikkonen (second blue car) is in a good position given that he is running a back of the pack strategy.
I decided to build a middle-play car that could real the leaders in with a 180 top speed. I think I only need a 40 accel because of the fast speeds you have coming out of corners before the big straights but a 60 decel to help slow down before corner 1 in particular. I went with a 60 start so I did not spend the first 2-3 turns just getting up to speed. 2x laps in skill and 7x laps in wear round out the car. There are not enough corners here to justify 8 wear in my book.

Here is the track after pole bid was completed. (Note that I switched to the old blue car because the brown one I used last race did not show up well against the black asphalt.) I bid 7 (all but 1 of my skill) and ended up 3rd... I was a pip away from being tied with Vettel. Fangio got pole with a bid of 9.5. Jackie Stewart got the best value with 4th after bidding only 3.5. Stewart than flipped his strategy card from his original idea of Back Standard to Front A. The rest of the field bid from 0 to 2.5.
Lap 1:

Bad start for me. I pushed my start speed, used 1 skill and rolled an 11 which means I mis-shifted down to 40! You can see the hoards rush past me as Fangio (blue), Vettel (red), and Stewart (green) race off into the distance.
Alonso in the other red car went from 9th to 4th here.

Stewart takes the lead exiting corner 1 (above) by pushing accel and top to get to 180 and leap frogs Vettel (1st red car) and Fangio (1st blue car) into first.

Stewart continues to press from the front and spends two wear plus a naked chance in corner 2! He makes it. Fangio moves into 2nd by taking the slip from Stewart into the corner.

Three of the first 5 cars on track right now have a 140 top speed. Stewart already took advantage of his top speed to take the lead earlier this lap. Now it's Alonso's turn after he too pushes his accel and top to go 180 and into 2nd.
Two turns later, Vettel got two slips from Alonso when Alonso pushed to 180. After running the Parabolica even, Vettel pulled ahead heading into corner 1 of lap 2 making use of his higher decel and desire to spend more wear in that corner.
Two turns later, Vettel got two slips from Alonso when Alonso pushed to 180. After running the Parabolica even, Vettel pulled ahead heading into corner 1 of lap 2 making use of his higher decel and desire to spend more wear in that corner.
Lap 2:

Above we see the payoff for Vettel (in red) as he has a gap now between him and the rest of the pack. And we can barely see Stewart (green) off in the distance having completed his first third of the race.
This was an interesting turn through the first corner for the pack. Fangio, Mansell (1st white car), and Hunt (2nd white car) started this turn 3-wide in front of the corner: Fangio on the line and Hunt outside. I (old speed circuit car) was on the line behind Fangio and feared I was going to be blocked but plotted 100 to leave options open and to delay the brakes test if I had to. Lucky for me the seas parted and I got through for 2 wear, passed two cars and pulled up next to Fangio.
Raikkonen (second blue car) is in a good position given that he is running a back of the pack strategy.
It will be interesting to see if the 140 top speed cars can keep up. Vettel has a stack of green skill he can use but the rest could be in trouble on this track. It will also be interesting to see how many damaged engines and related DNFs occur after the historical drivers run out of their green skill and still feel the need to push the engines.
Thursday, May 4, 2017
Custom Infinity Army Box Build
After painting some minis I wanted a better way to store them without the expense of a fancy case. So, I built my own.
Huge thanks to the Esoteric Order of Gamers for the excellent video tutorial about making boardgame box inserts using foamcore.
The foam itself was hard to come by in the small quantity and custom size I needed. But the Foam Factory came through. I used custom cut, charcoal foam, regular.
Huge thanks to Braddock Station Garrison for the rocking music. Their newest album is awesome, check it out.
Tuesday, May 2, 2017
Street Racing: a hand management, push your luck game for 2 players

This game was inspired by two complaints about racing games I heard from different people in the industry. Jim Dietz of Jolly Roger games once told me that there were not enough two player racing games. Not long after that Tom Vasel wondered why racing games were never quick playing. I don't recall which review it was in. Both comments stuck with me and at the risk of pigeon holing myself, I started working on a quick-playing, two-player racing game.
Ironically, BGG is currently running a 2-player game contest that I entered the game in. So if this already intrigues you, go print out the game and give it a play. While you are there, find other 2-player games you might like.
Ironically, BGG is currently running a 2-player game contest that I entered the game in. So if this already intrigues you, go print out the game and give it a play. While you are there, find other 2-player games you might like.
Development
The initial version was an attempt to model real life production sports cars. Each deck of cards had different values for acceleration, braking, and handling. Each turn you would play any number of cards one value or another. When you hit a corner, you would draw tokens from a bag equal to your speed minus your handling hoping not to draw too many of the bad ones.
The initial problem was that card draw luck was too dominant. Each card could only do one thing. If you did not draw enough of what you needed, when you needed you would lose through no fault of your play.
So I gave each card two abilities at different levels. This helped, but the whole system was still too much based on card draw luck. Each player had an identical deck of 12 cards. Which 4 or 5 you drew to start and as the game progressed defined your play. There really were not enough good choices in the game.

As I continued to refine and play test I realized that I needed to simplify and focus on the two elements I had chosen for the game: hand management and push your luck.
Push Your Luck
In early versions of the game, you would draw a certain number of tokens from a bag based on your speed. In this version, each time a token is drawn the player can chose to stop and slow down or continue drawing tokens and possibly incurring a penalty. This ratcheted up the decisions. Instead of making 1 push-your-luck decision per turn, a player could end up making several different ones as their turn progresses.
Hand Management
I decided to thin the deck down to 5 cards and give all 5 to each driver to start the game. This focused the game on your choices of when to play each card and removed the luck of the draw. I also tried to create different decisions based on your opponent's play and your current hand size.
Each card is numbered 0 - 4. The value of the cards indicates how much to increase your speed this turn. Faster is pretty much always better. Some cards also give you a bonus to handling.
 The Push (4) card is generally the best card you have with the highest value and the best handling bonus. But the only way to put cards you have played back into your hand is to play other cards with special abilities. So you will have to play other cards.
The Pass (3) and Block (2) cards can do different things base don your opponent. The Pass card is actually better than the Push if your are behind in the race. While the Block card counters the advantages of the Pass card.
The last two cards will have to be used to replenish your hand. The Cruise (1) allows you to put one of your previously played cards back in your hand while the Coast (0) allows you to put all of your cards in your hand. When to play each of these cards is crucial to a fast race.
Play Test
As I noted above, the game components and complete rules are available on BGG. Please note your thoughts on that page and try out other games in the contest too.
Push Your Luck
In early versions of the game, you would draw a certain number of tokens from a bag based on your speed. In this version, each time a token is drawn the player can chose to stop and slow down or continue drawing tokens and possibly incurring a penalty. This ratcheted up the decisions. Instead of making 1 push-your-luck decision per turn, a player could end up making several different ones as their turn progresses.
Hand Management
I decided to thin the deck down to 5 cards and give all 5 to each driver to start the game. This focused the game on your choices of when to play each card and removed the luck of the draw. I also tried to create different decisions based on your opponent's play and your current hand size.
Each card is numbered 0 - 4. The value of the cards indicates how much to increase your speed this turn. Faster is pretty much always better. Some cards also give you a bonus to handling.

The Pass (3) and Block (2) cards can do different things base don your opponent. The Pass card is actually better than the Push if your are behind in the race. While the Block card counters the advantages of the Pass card.
The last two cards will have to be used to replenish your hand. The Cruise (1) allows you to put one of your previously played cards back in your hand while the Coast (0) allows you to put all of your cards in your hand. When to play each of these cards is crucial to a fast race.
Play Test
As I noted above, the game components and complete rules are available on BGG. Please note your thoughts on that page and try out other games in the contest too.
Subscribe to:
Posts (Atom)